WSL2 (Windows Subsystem for Linux version 2)
WSL (Windows Subsystem for Linux) lets you use Linux on top of Windows natively. WSL2 is the latest version of WSL and is more stable with improved performance and compatibility. If you already have WSL(1), it is easy to convert to WSL2 (see Instructions to convert WSL(1) to WSL2). If your Windows 10 is version 1909 or older, see the “Install WSL2 on Windows 10 (older versions)” section on this page.
Install WSL2 on Windows 10 or 11
- Open Start (Win key) and search for Command Prompt (type directly) in your applications,
right-click and select
Run as administrator. SelectYeson the prompt that appears asking if you want to allow the app to make changes to your device. -
Type the following into the Command Prompt, then press
Enter:wsl --install - Restart your computer to finish the WSL installation and continue with the Linux distro setup.
- Open Start (Win key) and search for Command Prompt in your
applications, right-click and select
Run as administrator. SelectYeson the prompt that appears asking if you want to allow the app to make changes to your device. - At this point, if you are on a newer version of Windows 10 or Windows 11, the command from Step 2 should have installed, in addition to WSL, the latest LTS version of Ubuntu (26.04 LTS at time of writing) as the default distribution. If this is the case, an Ubuntu terminal will open to resume automatic setup, and afterwards will ask you set up a username and password. If this applies to you, skip to Step 9. Otherwise, continue with Step 6.
-
In the Command Prompt, type the following command to view a list of available WSL distros you can install and press Enter:
wsl --list --online -
Type the following command to install a specific distro (Ubuntu-26.04 recommended) in WSL and press
Enter(it will start the distro if it has already been installed):wsl --install -d <DISTRO-NAME> - Restart your computer, open Start (Win key) and search for Ubuntu, and click on the app called Ubuntu or Ubuntu <VERSION-NUMBER>. You should now have the WSL2 Ubuntu 26.04 terminal open. Now, you are ready to rock!
- You will be prompted to
Enter new UNIX username(this will create a local user account for the Ubuntu WSL instance and you will be automatically logged in to your Ubuntu distro as this user). You can use any combination of alphanumeric characters for your username, but a good choice is<first_initial><last_name>(e.g.,jsmithfor John Smith). You will then be prompted to enter a new password (store this password in a safe place, you will need to use it during the course).
From this point on, whenever the instructions specify to “open/type a command in a terminal”, please do so using the Ubuntu application (open Start (Win key), search for Ubuntu, and click Ubuntu or Ubuntu <VERSION-NUMBER>). Do not use Command Prompt or Powershell for the remaining steps unless explicitly stated.
Need more help?
- https://learn.microsoft.com/en-us/windows/wsl/install
- https://ubuntu.com/tutorials/install-ubuntu-on-wsl2-on-windows-11-with-gui-support#2-install-wsl
Bash shell (in the WSL2 Ubuntu)
You already have it, now that you’ve installed the WSL2!
Git (in the WSL2 Ubuntu)
You already have it, now that you’ve installed the WSL2!
Git configuration
If you have never used Git on your computer, you may have to configure it. The following instructions assume you have already created a GitHub account following the main Setup page.
Type the following commands in a terminal.
Notes:
- For
user.email, use the email associated with your GitHub account. user.namecan be any name you want to use to author your commits, but we recommend using the display name on your GitHub profile.
git config --global user.name "Jane Doe"  # Set the author name for your commits
git config --global user.email "janedoe@example.com"  # Set the email linked to your commits
git config --global core.autocrlf input  # Automatically standardize line endings when committing
git config --global init.defaultBranch main  # Make new repos use "main" as the default branch name
git config --global pull.rebase false  # Make "git pull" combine changes using merge by default
Tip: You can check your Git configuration at any time with: git config --list
Create an SSH key for GitHub
Important: When following the GitHub docs in the steps below, make sure to:
- Select the Linux instructions at the top of the page
- Run all commands in your Ubuntu terminal
To authenticate to GitHub from the command line, you will use an SSH key pair, which is more secure than using your GitHub account password directly.
-
In a terminal, check if you have existing SSH keys in the ~/.ssh directory.
A public/private key pair typically has the filename format
id_ALGORITHMandid_ALGORITHM.pub. If you have existing key files, use a different, custom name for your SSH key pair in step 2. -
Generate a new SSH key and add it to the ssh-agent.
- Use the default file location for saving the key, unless you already have existing keys - in this case, replace just the
id_ALGORITHM(e.g.,id_ed25519) part of the file location with an informative keyname likeid_ed25519_github - Store your passphrase in a secure location, as you will need to use it for certain Git commands
- Use the default file location for saving the key, unless you already have existing keys - in this case, replace just the
-
Confirm your key pair was created by running the command:
You should see two files with your key name, one withls -la ~/.ssh.pub(the public key) and one without (the private key - do not share or copy this file!). -
Add the SSH key to your GitHub account.
- Be careful when copying/pasting the public key to not accidentally add spaces or newlines
- Choose Authentication Key for the key type
-
Locally specify the SSH key to use when connecting to GitHub, so that the right "identity" is always used for local Git operations (useful when you have multiple keys).
-
Run the following command (if you used a custom key name, replace
id_ed25519with your private key's filename):printf 'Host github.com\n User git\n IdentityFile ~/.ssh/id_ed25519\n IdentitiesOnly yes\n' >> ~/.ssh/config -
Then, check that the config was added:
You should see something like:cat ~/.ssh/configHost github.com User git IdentityFile ~/.ssh/id_ed25519 IdentitiesOnly yes
-
Run the following command (if you used a custom key name, replace
In this course, when using a Git command that prompts you for your passphrase, enter the passphrase you set for your private key in step 2.
VSCode (on your Windows)
- Go to this page and click the download
button, then run the
.exefile. - Leave all the defaults during the installation, but make sure that “Register Code as an editor for supported file types” is selected.
VSCode extensions
These extensions will allow you to work with WSL2 Ubuntu more seamlessly in VSCode.
- Open Visual Studio Code, click on the Extensions icon in the left sidebar
(or press
Ctrl+Shift+X), and search for and install the WSL extension (usually, VSCode can automatically detect your WSL Ubuntu installation and prompt you to install related extensions in the bottom right corner). - In a terminal (Ubuntu), type
code .and pressEnter. You should see a message readingInstalling VS Code Server, and then a new VSCode window will open up. The bottom left corner of the window should readWSL.
NOTE: The first time you run
code .in a folder, you may see a popup asking "Do you trust the authors of the files in that folder?"Select "Yes, I trust the authors", and if available, also check the box that says "Trust the authors of all files in the parent folder". This will enable full features and extensions in your VSCode workspace.
- In the new WSL VSCode window, open the Extensions panel again (or
Ctrl+Shift+X). Search for each of the following extensions and clickInstall(orInstall in WSL: Ubuntu, if you already have the extension installed locally) for the first entry that appears. If noInstallbutton is available and the extension is not grayed out, it means it is already installed.
- Python Extension Pack (note: you may need to reload VSCode after installing this)
- Jupyter
- Docker
- WSL (only if you're on Windows)
To confirm the extensions have been installed correctly, clear the Extensions search bar.
You should now see an extensions category called WSL: UBUNTU - INSTALLED
(you may also see one for LOCAL - INSTALLED).
Verify that the extensions you have just installed appear in the list under WSL: UBUNTU - INSTALLED.
WSL2 Ubuntu terminal in VSCode
To open the terminal in your WSL VSCode window (if you do not already see
one at the bottom of the window), navigate to View > Terminal in
the top menu bar (or Ctrl+`).
This terminal in a WSL VSCode window is equivalent to the WSL2 Ubuntu terminal we get from opening the Ubuntu app itself (e.g., from the Start (Win key) menu), but with the advantage of having all the graphical features of VSCode at your disposal.
Reference: https://code.visualstudio.com/docs/remote/wsl
Setting up GitHub Copilot in VSCode
In any VSCode window, click the Copilot icon near the bottom right corner of the bottom status bar and select "Use AI Features", then follow the prompts to sign in using GitHub.
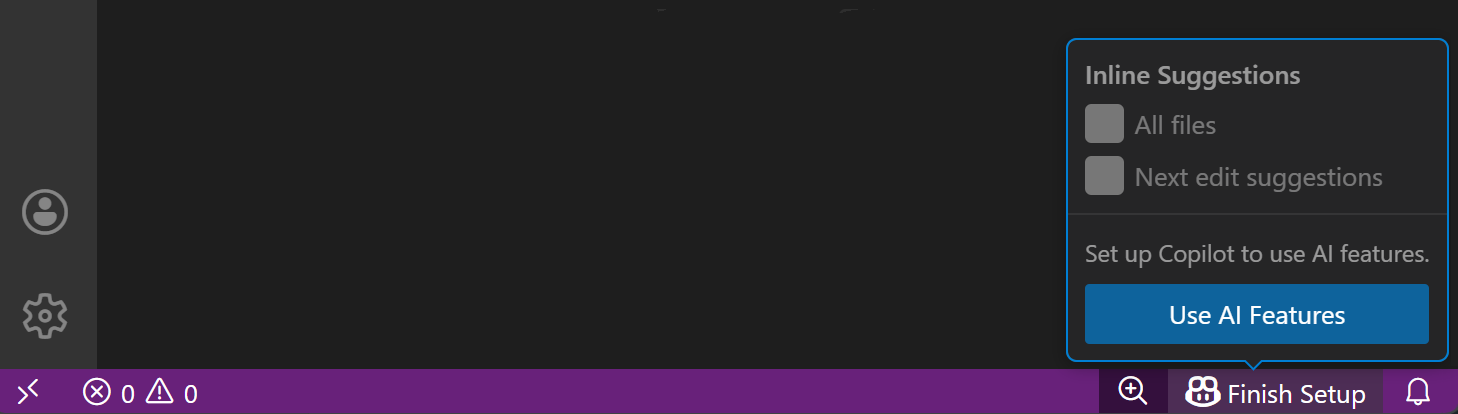
This will give you access to the Copilot Free plan in VSCode.
To open the Copilot chat, go to View > Chat.
Python (in the WSL2 Ubuntu)
We will now install miniconda to manage the Python environment in our WSL2 Ubuntu using the WSL VSCode terminal (you can also use the WSL2 Ubuntu terminal directly).
-
Type the following lines (separately) into the terminal and press
Enterafter each one:wget https://repo.anaconda.com/miniconda/Miniconda3-latest-Linux-x86_64.sh bash Miniconda3-latest-Linux-x86_64.sh - A license agreement will be displayed and the bottom of the terminal will read
--More--. PressEnteror the space bar until you are prompted withDo you accept the license terms? [yes|no].Typeyesand then pressEnter. - The installer will show a default installation directory (e.g.,
/home/$USER/miniconda3). Leave this default and pressEnter. - When you are asked
Do you wish the installer to initialize Miniconda3 by
running conda init? [yes|no]
, typeyesand pressEnter. Close the terminal once the installation has finished (you can do this by typingexit). - Re-open the Ubuntu terminal.
Type
which pythonand check that it returns a path like:/home/$USER/miniconda3/bin/python.- If you do not see a path like this, try
cd miniconda3/bin/then./conda init, close and re-open your terminal, then repeat this step. If your issue is still not resolved, skip the following step and contact an instructor on the#help-installationchannel on the Slack workspace.
- If you do not see a path like this, try
-
Type the following to remove the installation script that was downloaded:
rm ./Miniconda3-latest-Linux-x86_64.sh
Python packages
Open a terminal and type the following commands (press Enter after each):
conda config --append channels conda-forge  # add conda-forge as a source for packages (channel)
conda config --set channel_priority strict  # prioritize packages based on channel order
conda create -n qlsc612 -y python=3.12 flake8 jupyter nilearn scikit-learn pandas matplotlib seaborn bokeh statsmodels plotly wordcloud
conda activate qlsc612
This installation step (conda create) will take a couple minutes.
The above commands create a new conda Python environment named qlsc612
with all the necessary packages installed for this course.
The last line, conda activate qlsc612,
will activate this Python environment (the default environment is base).
Once the commands have finished running, you should see (qlsc612) at the beginning of your shell prompt
to indicate that the new environment is active.
You can now use VSCode to edit a Python script or Jupyter Notebook in your WSL2 Ubuntu distribution.
Reminders:
- Each time you launch the WSL2 Ubuntu, you may need to reactivate the
qlsc612environment for the terminal withconda activate qlsc612. - When running a Jupyter notebook in VSCode (remote access to your WSL2 Ubuntu),
you will also need to specify the Python environment for the notebook (kernel).
This will be demonstrated in class, but as a reference:
- There will be a
Select Kernelbutton in the top right corner of the Jupyter notebook window. Click this button and select the option that looks like qlsc612 (Python 3.x.y) ~/miniconda3/envs/qlsc612/bin/python. - The button should now be updated to read qlsc612 (Python 3.x.y). This is the Python environment we have just created for this course.
Docker Desktop for Windows
Only install Docker Desktop after you have successfully installed WSL2.
- Go to this page and click “Docker Desktop for Windows”, then run the downloaded installer.
- When prompted, ensure the “Use WSL 2 instead of Hyper-V” on the Configuration page is selected.
- Follow the instructions in the installation wizard to authorize the installer and proceed with the installation.
- Once the installation is successful, click “Close” to complete the
installation process.
- NOTE: If the admin account on your computer is different from your user account, you must add the user to the docker-users group. Run Computer Management as an administrator and navigate to Local Users and Groups > Groups > docker-users. Right-click to add the user to the group. Log out and log back in for the changes to take effect.
- Open Start (Win key), search for Docker Desktop in your applications, and click to run the app.
Once Docker Desktop has loaded, in a WSL2 Ubuntu terminal (in VSCode or your Ubuntu app),
type
docker run hello-world. If the installation worked, a brief introductory message should be printed to the screen.
Reminders:
- Whenever you need to use Docker, first make sure that Docker Desktop is running (open Start (Win key) and search for the Docker Desktop app)
- For this course, you should always run Docker commands from a WSL2 Ubuntu terminal. However, in general, you can also use Docker command-line tools in Command Prompt or PowerShell.
The above step-by-step instructions are distilled from https://docs.docker.com/desktop/setup/install/windows-install/.
Install the tree command
tree is a helpful command for viewing directory structures, and is strongly recommended.
- Open a terminal (Ubuntu), and check if you have
treealready installed by runningtree --version.- If you see a version number, you’re all set!
- If you see a message like
tree: command not found, install it by running:sudo apt-get update && sudo apt-get install -y treeYou may be prompted to enter your password to proceed. If so, use the password for the WSL Ubuntu account you created during the WSL2 setup.