Bash shell
You already have it! Depending on which version of Linux you’re running you may
need to type bash inside the terminal to access it. To check whether this is
necessary, follow these steps:
- Open a terminal and type
echo $SHELL.- If it reads
/bin/bashthen you are all set! - If not, whenever the instructions read open a terminal,
please assume you are to open a terminal, type
bash, and the proceed with the instructions as specified.
- If it reads
Git
You may already have it!
Open a terminal and type git --version.
If this prints something like git version X.XX.X, git is already installed! If so, skip to the next section on “Git configuration”.
If git is not installed, type sudo apt-get install git (Ubuntu, Debian)
or sudo dnf install git (Fedora),
then follow the instructions on-screen to complete the installation.
Git configuration
If you have never used Git on your computer, you may have to configure it. The following instructions assume you have already created a GitHub account following the main Setup page.
Type the following commands in a terminal.
Notes:
- For
user.email, use the email associated with your GitHub account. user.namecan be any name you want to use to author your commits, but we recommend using the display name on your GitHub profile.
git config --global user.name "Jane Doe"  # Set the author name for your commits
git config --global user.email "janedoe@example.com"  # Set the email linked to your commits
git config --global core.autocrlf input  # Automatically standardize line endings when committing
git config --global init.defaultBranch main  # Make new repos use "main" as the default branch name
git config --global pull.rebase false  # Make "git pull" combine changes using merge by default
Tip: You can check your Git configuration at any time with: git config --list
Create an SSH key for GitHub
When following the GitHub docs in the steps below, make sure to select the Linux instructions at the top of the page.
To authenticate to GitHub from the command line, you will use an SSH key pair, which is more secure than using your GitHub account password directly.
-
In a terminal, check if you have existing SSH keys in the ~/.ssh directory.
A public/private key pair typically has the filename format
id_ALGORITHMandid_ALGORITHM.pub. If you have existing key files, use a different, custom name for your SSH key pair in step 2. -
Generate a new SSH key and add it to the ssh-agent.
- Use the default file location for saving the key, unless you already have existing keys - in this case, replace just the
id_ALGORITHM(e.g.,id_ed25519) part of the file location with an informative keyname likeid_ed25519_github - Store your passphrase in a secure location, as you will need to use it for certain Git commands
- Use the default file location for saving the key, unless you already have existing keys - in this case, replace just the
-
Confirm your key pair was created by running the command:
You should see two files with your key name, one withls -la ~/.ssh.pub(the public key) and one without (the private key - do not share or copy this file!). -
Add the SSH key to your GitHub account.
- Be careful when copying/pasting the public key to not accidentally add spaces or newlines
- Choose Authentication Key for the key type
-
Locally specify the SSH key to use when connecting to GitHub, so that the right "identity" is always used for local Git operations (useful when you have multiple keys).
-
Run the following command (if you used a custom key name, replace
id_ed25519with your private key's filename):printf 'Host github.com\n User git\n IdentityFile ~/.ssh/id_ed25519\n IdentitiesOnly yes\n' >> ~/.ssh/config -
Then, check that the config was added:
You should see something like:cat ~/.ssh/configHost github.com User git IdentityFile ~/.ssh/id_ed25519 IdentitiesOnly yes
-
Run the following command (if you used a custom key name, replace
In this course, when using a Git command that prompts you for your passphrase, enter the passphrase you set for your private key in step 2.
VSCode
- Go to this page and click the download
button for either the
.deb(Ubuntu, Debian) or the.rpm(Fedora, CentOS) file. - Double-click the downloaded file to install VSCode (you may be prompted to type your administrator password during the install).
- To confirm that everything worked, open a terminal and type
code .(include the period). This should open the current directory in a VSCode window.
NOTE: The first time you run
code .in a folder, you may see a popup asking "Do you trust the authors of the files in that folder?"Select "Yes, I trust the authors", and if available, also check the box that says "Trust the authors of all files in the parent folder". This will enable full features and extensions in your VSCode workspace.
VSCode extensions
- Open the Visual Studio Code application.
- Open the Extension side panel by pressing
Ctrl+Shift+X. In the search bar at the top of this panel search for each of the following extensions and pressInstallfor the first entry that appears.
- Python Extension Pack (note: you may need to reload VSCode after installing this)
- Jupyter
- Docker
- WSL (only if you're on Windows)
Setting up GitHub Copilot in VSCode
In any VSCode window, click the Copilot icon near the bottom right corner of the bottom status bar and select "Use AI Features", then follow the prompts to sign in using GitHub.
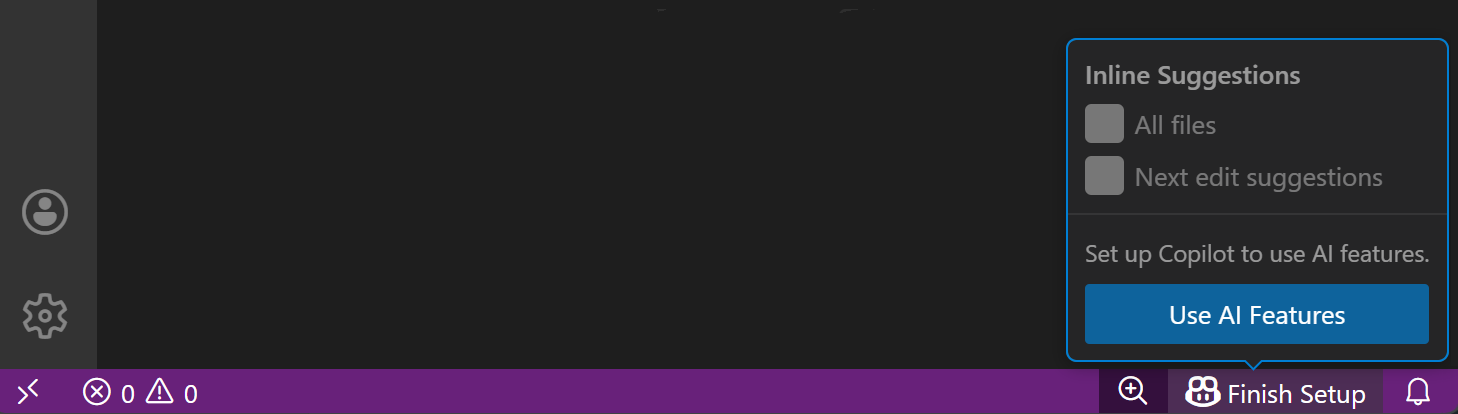
This will give you access to the Copilot Free plan in VSCode.
To open the Copilot chat, go to View > Chat.
Python
-
Open a new terminal and type the following lines (separately) into the terminal, pressing
Enterafter each one:wget https://repo.anaconda.com/miniconda/Miniconda3-latest-Linux-x86_64.sh bash Miniconda3-latest-Linux-x86_64.sh - A license agreement will be displayed and the bottom of the terminal will read
--More--. PressEnteror the space bar until you are prompted withDo you accept the license terms? [yes|no]. Typeyesand then pressEnter. - The installation script will inform you that it is going to install into a default directory (e.g.,
/home/$USER/miniconda3). Leave this default and pressEnter. - When you are asked
Do you wish the installer to initialize Miniconda3 by running conda init? [yes|no], typeyesand pressEnter. Exit the terminal once the installation has finished. - Re-open a new terminal.
Type
which pythoninto the terminal and check that it returns a path like/home/$USER/miniconda3/bin/python.- If you do not see a path like this, try typing
conda init, closing your terminal, and repeating this step. If your issue is still not resolved skip the following step and contact an instructor on the#help-installationchannel of the Slack workspace.
- If you do not see a path like this, try typing
-
Type the following to remove the installation script that was downloaded:
rm ./Miniconda3-latest-Linux-x86_64.sh
Python packages
Open a terminal and type the following commands (press Enter after each):
conda config --append channels conda-forge  # add conda-forge as a source for packages (channel)
conda config --set channel_priority strict  # prioritize packages based on channel order
conda create -n qlsc612 -y python=3.12 flake8 jupyter nilearn scikit-learn pandas matplotlib seaborn bokeh statsmodels plotly wordcloud
conda activate qlsc612
This installation step (conda create) will take a couple minutes.
The above commands create a new conda Python environment named qlsc612
with all the necessary packages installed for this course.
The last line, conda activate qlsc612,
will activate this Python environment (the default environment is base).
Once the commands have finished running, you should see (qlsc612) at the beginning of your shell prompt
to indicate that the new environment is active.
Docker
- You will be following different instructions depending on your distro (Ubuntu, Debian, Fedora, CentOS). Make sure to follow the “Install using the repository” method!
- Once you’ve installed Docker make sure to follow the post-install instructions as well. You only need to do the “Manage Docker as a non-root user” and “Configure Docker to start on boot” steps.
- Open a new terminal and type
docker run hello-world. If the installation worked, a brief introductory message should be printed to the screen.
Install the tree command
tree is a helpful command for viewing directory structures, and is strongly recommended.
- Open a terminal, and check if you have
treealready installed by runningtree --version.- If you see a version number, you’re all set!
- If you see a message like
tree: command not found, install it by running:sudo apt-get update && sudo apt-get install -y tree